

Modern Table Runner
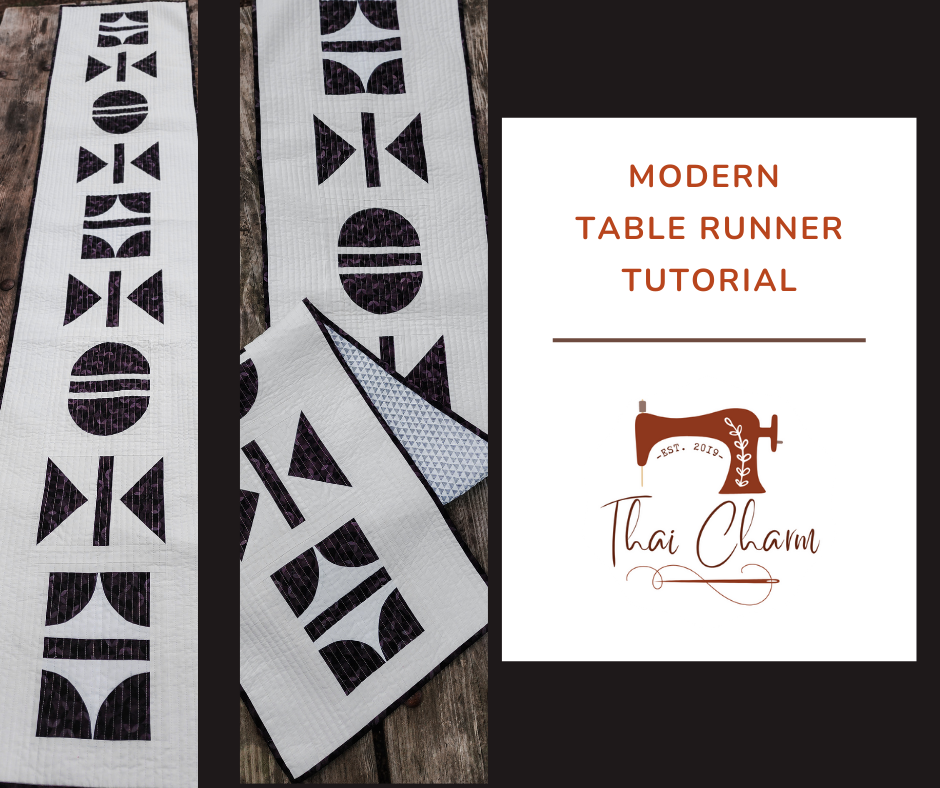
It is that time of the year when family and friends are getting together. It means time to upgrade your table decor and this Modern Table Runner will give you just that! Let’s talk piecing techniques. This runner can be done with traditional piecing method, but since I am not going into too much details for how to make your curve blocks, I would rate the skill level for this pattern as “Advanced Beginner - Intermediate”. The finished size is 16 x 76 inches.Supplies
Simple sewing machineThreadCutting matRulerRotary cutterStraight pinsIron & ironing board
Fabric Requirements for 2 colored version
White Fabric for Background: 1 1/8 yards (I usually round up to 1 1/4 yards) - I used Confetti Cotton in Cloud by Riley Blake Designs for 2 colored versionBlack Fabric for accent: 1/2 yard - I used Crayola Kaleidoscope in Toy Poodle by Riley Blake Designs for 2 colored versionBinding: 3/8 yard for (5) 2 1/2” stripsBacking: 2 3/8 yardsFabric requirements for the multicolored version listed here - I used Fabric from Eclectic Intuition Collection by Art Gallery Fabrics for Multicolored version

Step 1: Cut Your Fabric
Press your fabric, and let's start cutting the pieces for this runner. *Note* WOF = Width of fabric assumes to be 42 inchesBackground Fabric (White):
(1) 5 3/4” x WOF , subcut into (4) 5 3/4” Squares and (6) 1 1/2” x 8 1/2” strips
(1) 4 3/4” x WOF , subcut into (6) Template A1 (right side) and (6) Template A2 (wrong side)
*Note* If you use solid fabric which is the same on both side (most of the time), then you can lay the template right side up and cut (12) Template A1**Tip** Lay your template A2 wrong side up on top of your fabric to cut the mirror shape
(1) 4 1/2” x WOF , subcut into (4) Template B1 and (6) 1” x 6 1/2” Strips
(3) 1 1/2” x WOF , subcut into (12) 1 1/2” x 8 1/2” strips
(1) 1” x WOF , subcut into (6) 1” x 6 1/2” strips
Borders: (4) 4 1/2” x WOF , pieced together and subcut into (2) 4 1/2” x 76 1/2" for top and bottom borders.
Use leftover fabric to cut (2) 2 1/2” x 8 1/2” for left and right bordersAccent Fabric (Black): (1) 5 3/4” x WOF , subcut into (4) 5 3/4” Squares and (6) 1 1/2” x 6 1/2” strips (1) 3 3/4” x WOF , subcut into (6) Template A2 (right side) and (6) Template A2 (wrong side) *Note* If you use solid fabric which is the same on both side (most of the time), then you can lay the template right side up and cut (12) Template A2 **Tip** Lay your template A2 wrong side up on top of your fabric to cut the mirror shape (1) 3 3/4” x WOF , subcut into (4) Template B1 , (3) 1 1/2” x 6 1/2” Strips *Note* You will have a total of (9) 1 1/2” x 6 1/2” stripsMaking Block 1
You will need …

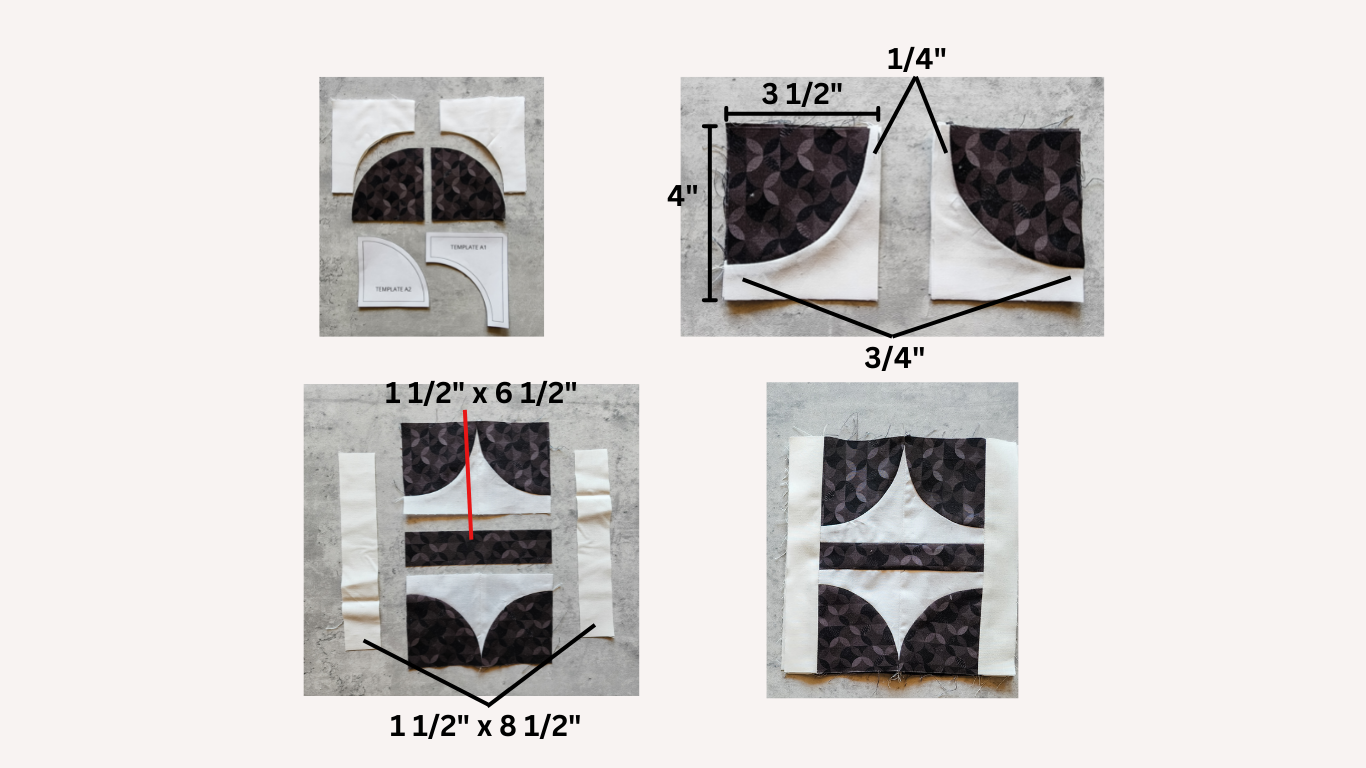
Pair Curve Unit A2 with Arch Unit A1. Fold each piece in half and mark the center with the crease.Lay Arch Unit on top of Curve Unit, right sides together. Line up the creased center lines. Pin at the center point, then the edges. Pin as often as desired.Sew 1/4” seam along the curve, carefully adjust the fabric as needed. Press towards Arch Unit.Trim to 3 1/2” x 4”. Be sure to leave 1/4” seam allowance on one side of the curve (shown in picture below).Repeat Step 1-4 until you create all of the quarter circle units. (Make 12 units)Pair (1) quarter circle unit with (1) mirror unit, sew together as shown below. Press open. Pay close attention to the orientation of the units. (Make 6 units)Add the 1 1/2” x 6 1/2” (center strip) to the unit from Step 6, then add (2) 1 1/2” x 8 1/2” strips on either side of the block. Trim as needed to 8 1/2" x 8 1/2". (Make 3 Blocks)
Making Block 2
You will need …

Pair Curve Unit B2 with Arch Unit B1. Fold each piece in half and mark the center with the crease.Lay Arch Unit on top of Curve Unit, right sides together. Line up the creased center lines. Pin at the center point, then the edges. Pin as often as desired.Sew 1/4” seam along the curve, carefully adjust the fabric as needed. Press towards Arch Unit.Trim to 3 1/2” x 6 1/2”. Be sure to leave 1/4” seam allowance on either side of the curve.Repeat Step 1-4 until you create all of the half circle units. (Make 4 units)Make the Center Strip set by sewing (2) 1" x 6 1/2" white background strips to either side of (1) 1 1/2" x 6 1/2" black accent strip. Press towards the dark side.Sew (2) half circle units to either side of the strip set from Step 6. Press open or towards the strip set. Add (2) 1 1/2" x 8 1/2" white background strips to either side of the block. Press. Trim as needed to 8 1/2" x 8 1/2". (Make 2 blocks)

Making Block 3
You will need …

Stack (1) White 5 3/4" square on top of (1) Black 5 3/4" square, then pin in place. Sew a ¼” seam continually around the entire square, pivoting at the corners.Cut the square twice from corner to corner diagonally.Press seams open. Trim to 3 1/2" x 3 1/2".Repeat Step 1-3 until you create 16 half square triangles.Make the Center Strip set by sewing (2) 1" x 6 1/2" white background strips to either side of (1) 1 1/2" x 6 1/2" black accent strip. Press towards the dark side.Sew (2) half square triangles (HSTs) from Step 3 together in the orientation show in below picture. Press open. Repeat this step with all of your HSTs. Sew (2) HST units to either side of the strip set from Step 5. Press open or towards the strip set. Add (2) 1 1/2" x 8 1/2" white background strips to either side of the block. Press. Trim as needed to 8 1/2" x 8 1/2". (Make 4 blocks)

Quilt Top Assembly
You will need all of Block 1, Block 2 , Block 3 and Border strips
Sew the blocks together in the orientation shown below. Press open.
Add (2) 2 1/2” x 8 1/2” border strips to either side of the unit made in previous step. Press toward the strips.
Add (1) 4 1/2” x 76 1/2” border strip to the top and the other border strip to the bottom of the unit. Press toward the strips.

Quilting & Binding
Now that your top is done, you may quilt as desired. I chose to do straight line quilting using my walking foot, about 1/2" apart. I attached the binding with my machine to the front and finished it with big stitch binding to the back. That's it ... you're done!